
- PREPARATION
- THE BEGINNING
- VISUAL STUDIO
- UNDERSTANDING THE CODE
- MOVING INTO THE SOURCE FILE
- THE GLOBAL FUNCTIONS
- MAKEINTRESOURCE MACRO
- THE MESSAGE HANDLING FUNCTIONS
- ABOUT BOX MESSAGE HANDLER
- A (BRIEF) SUMMARY
- THE DIRECTX PART AND DIALOG BOX
- INITDIRECTX FUNCTION SUMMARY
- LOGADAPTER FUNCTION
- LOGRESOLUTION FUNCTION
- THE .CPP FILE
PREPARATION
What follows is a somewhat in depth description of my progress with compiling Windows and very basic DirectX programs from source. The article is intended for beginners or casual browsers of greater capacity as well. Although I suspect for the latter category it may only qualify as a case of light reading. I will begin with some descriptions of the basic workings behind the most simple windows programs that do not much more than display a blank window on screen. As the chapter progresses I will also cover some basic aspects of dialog boxes and how to use them combined with some DirectX functions to obtain information from the system hardware. We will also be able to make some basic rendering choices from the hardware options available, although rendering itself is not implemented or covered in this section.
What’s covered?
- A simple description of some of the Windows functions and variables used to launch a window that are contained within a basic starting program.
- Brief discussions about windows and windows messages, and why messages are such a fundamental topic.
- A few pointers on the layout of Visual Studio and some of its features and quirks.
What’s not covered or intended?
- This is done using Visual Studio 2022 on the free community-level license. I don’t cover compiling in other IDE’s here (although I do use them in my own time as well).
- Is not intended to be any sort of solid professional-level description of, or diagnosis of anything. The article is aimed at being helpful to those at an introductory level, and its style is mostly sourced from my own experiences and problems and all the questions I wished to have answers for at the time (and now do).
- This is not a tutorial on how to install or use Visual Studio. There are plenty of other sources that you can find online. This article expects you to at least have Visual Studio installed and be somewhat able to navigate around it.
- Basic familiarity with C++ fundamental concepts is expected. If you do not have this you can learn it at GeeksForGeeks. There is a good course available.
THE BEGINNING
One of the worst things I encountered when trying to learn was simply where to start. Many years ago I used Code::Blocks IDE which I like a great deal but to make use of the newest versions of DirectX I realized I was going to have to learn to use Visual Studio. I couldn’t find just a simple Windows program that would even show a window to learn from. Every time I tried to find a simple program in the available Visual Studio project templates I always seemed to pick the wrong one. Eventually, I found a program hosted on the Microsoft Learn site that would launch a simple window for me and I could learn from that.
Even getting that far can be fraught with danger though as I would often find myself copying and pasting code into a project that would still not run. Hence comes the first lesson. For our purposes, we want to create a Windows Desktop application. We are not creating a Console application, and we are NOT using MFC. A desktop application is not the same as a console application and Microsoft Foundation Class is not a good place to be learning.
VISUAL STUDIO
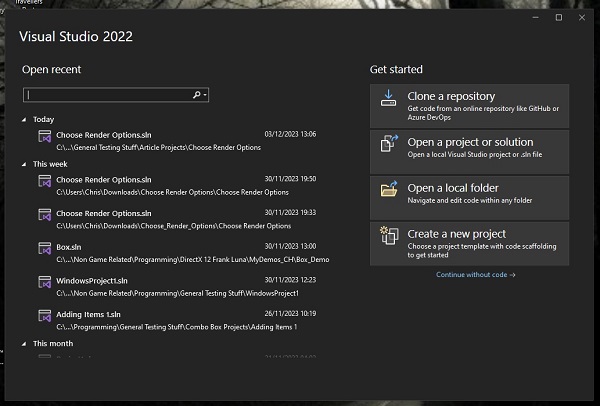
With Visual Studio open (correct as of 3/12/2023) we want to select create a new project. Below shows what a Visual Studio Project looks like once opened:
When prompted (or when navigating to the relevant menu section) select “Create a new project”:
When you see the following screen type “windows” into the search bar at the top:
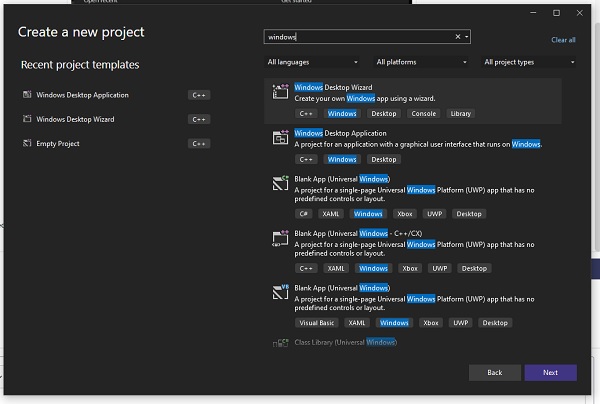
Select “Windows Desktop Application”. Click Next and then choose a suitable folder for your project and also select the checkbox “Place solution and project in the same directory”. Then click “Create”. Provided everything worked you’ll now have a program loaded that you can edit.
UNDERSTANDING THE CODE
That’s as much description as I will be providing on how to select and create the right project. If you follow the above steps you’ll have a working Windows program that will compile and show a window. If something goes wrong you can always ask for help on the relevant forums you can find on the web. That’s a huge mess of misunderstanding we have just gone past there and very quickly too. Starting on the wrong type of projects, and not knowing which projects to pick can be a draining experience. So it’s important to make sure you have the right starting place.
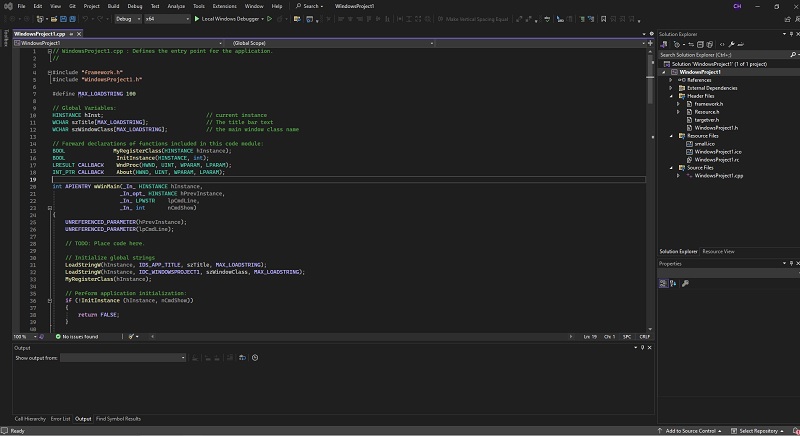
Once your project has loaded you will see something similar to the following (this is just a short sample):
// WindowsProject1.cpp : Defines the entry point for the application.

#include "framework.h"
#include "WindowsProject1.h"

#define MAX_LOADSTRING 100

// Global Variables:
HINSTANCE hInst;                                // current instance
WCHAR szTitle[MAX_LOADSTRING];                  // The title bar text
WCHAR szWindowClass[MAX_LOADSTRING];            // the main window class name

// Forward declarations of functions included in this code module:
BOOL               MyRegisterClass(HINSTANCE hInstance);
BOOL                InitInstance(HINSTANCE, int);
LRESULT CALLBACK    WndProc(HWND, UINT, WPARAM, LPARAM);
INT_PTR CALLBACK    About(HWND, UINT, WPARAM, LPARAM);


int APIENTRY wWinMain(_In_ HINSTANCE hInstance,
                     _In_opt_ HINSTANCE hPrevInstance,
                     _In_ LPWSTR    lpCmdLine,
                     _In_ int       nCmdShow)
{
The open window in Visual Studio contains all the source code we will need for our simple program. You will see on the far right side of the screen is where Visual Studio keeps access to relevant files associated with your project. Source files, header files and so on. This is the solution explorer, and we will need to access it a lot. All relevant files can be navigated to in here.
The first thing you’ll notice is the “framework.h” header file. If you open it using the solution explorer you’ll see it has some includes:
#pragma once

#include "targetver.h"
#define WIN32_LEAN_AND_MEAN             // Exclude rarely-used stuff from Windows headers

// Windows Header Files
#include <windows.h>

// C RunTime Header Files
#include <stdlib.h>
#include <malloc.h>
#include <memory.h>
#include <tchar.h>
The “#pragma once” part doesn’t concern us but it’s there to prevent multiple copies of the same header file being included by the compiler. I always include it in the header files I have written for programs so far. Next is the #include “targetver.h” include which contains a header for the most recent version of Windows. Below that is the windows include which is needed for all Windows-specific variables and functions, and below that are some standard includes such as malloc and stdlib. I won’t go into what those are here. One thing of interest however is the #include <tchar.h> line. It’s there to handle UNICODE characters if _UNICODE is defined.
Somewhere in either my project settings or in one of the header files _UNICODE must be defined as when I attempted to define it myself the compiler showed a macro redefinition warning. A TCHAR variable uses a macro to decide on the size of a character variable. You can read more about UNICODE online or in Charles Petzold’s book Programming Windows Fifth Edition. A book I can certainly recommend, as despite its age it contains excellent in-depth descriptions of just about any Windows concept that may concern us.
The size of a TCHAR variable depends on what the result of the macro is in the header file. If _UNICODE is defined then TCHAR becomes a wchar_t which at the time of writing is a 16-bit (2-byte) wide character. If _UNICODE is not defined then it simply becomes an 8-bit (1-byte) char. Thus one can reasonably expect to define a variable as a TCHAR and not have to worry about whether or not Unicode is being used. I suspect this is more of a concern from the past however as it’s reasonable to expect modern computers and certainly future ones to run on systems that accommodate Unicode wide characters by default. I would imagine it was a more serious problem at one time though.
Moving on to the last header file that concerns us is “Resource.h”. You can find it in the solution explorer. You’ll see it contains a collection of #defines that relate upper-case strings to numbers. We will need these later when we create our window and when we launch our dialog box. The uppercase strings just give us an easier thing to remember than a specific number. The exact data these numbers resolve to is found in the resource file included in your project folder. You can open it now and find the file below (which you can open with notepad):
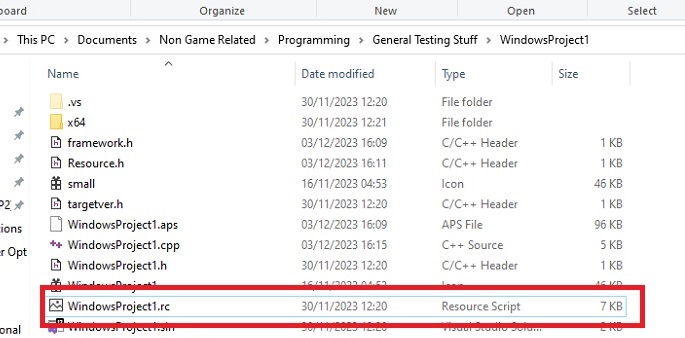
I’ll leave you to browse the file in Notepad but I do not recommend changing anything in there. It will give you some insight as to what is inside the resource file. When we make changes to an existing dialog box or make a new one in Visual Studio’s editor it updates the resource file with all the changes. That’s how Visual Studio’s resource editor and the (project name).rc file are related.
MOVING INTO THE SOURCE FILE
Now we re-visit the code from earlier, which I’ve included up to the start of the WinMain function:
#include "framework.h"
#include "WindowsProject1.h"

#define MAX_LOADSTRING 100

// Global Variables:
HINSTANCE hInst;                                // current instance
WCHAR szTitle[MAX_LOADSTRING];                  // The title bar text
WCHAR szWindowClass[MAX_LOADSTRING];            // the main window class name

// Forward declarations of functions included in this code module:
ATOM                MyRegisterClass(HINSTANCE hInstance);
BOOL                InitInstance(HINSTANCE, int);
LRESULT CALLBACK    WndProc(HWND, UINT, WPARAM, LPARAM);
INT_PTR CALLBACK    About(HWND, UINT, WPARAM, LPARAM);

int APIENTRY wWinMain(_In_ HINSTANCE hInstance,
                     _In_opt_ HINSTANCE hPrevInstance,
                     _In_ LPWSTR    lpCmdLine,
                     _In_ int       nCmdShow)
{
The headers we discussed earlier are at the top. The next thing that follows is a macro (MAX_LOADSTRING) which defines the maximum size of a string which we will use to set the title of the window we’re going to create, and its class name. Further down we see the initialization of some global variables.
The first being hInst which is of type HINSTANCE. A HINSTANCE is a handle to an application instance. Handles are a big thing in Windows and for our concerns in this program, none are bigger than HINSTANCE. It is, in common sense terms, the handle to everything that we are doing in this program. A handle in Windows is something best researched on the web as I cannot explain them in a way that will do them justice. Just know they are important, and they are how we access things. Essentially a unique identifier for either a program, a window, or even a dialog box control – such as a check button.
Below the HINSTANCE we see the two UNICODE capable wide character arrays defined with a length of MAX_LOADSTRING from before. One for the window title and the other for the class name. Notice we could have used TCHAR here perhaps. But I find it easier just to use wide character chars and strings right throughout the program, and for our purposes, this will work well enough. Below this are four forward declarations of functions we will use in this program. They will be discussed in turn.
THE GLOBAL FUNCTIONS
ATOM MyRegisterClass(HINSTANCE hInstance);
The first function is somewhat cause for alarm. It returns a type ATOM. I’ve attempted to research this type online but without much convincing success. I noticed when I checked in Visual Studio by right-clicking and using the “Peek Definition” facility it’s defined in “minwindef.h” (most likely a header file referenced ultimately from the “windows.h” header) as:
typedef WORD ATOM; //BUGBUG - might want to remove this from minwin
Which doesn’t particularly fill me with confidence, especially given that this is how Microsoft themselves describe it. In our program, I changed it simply to a BOOL without problems. So the new function declaration is:
BOOL MyRegisterClass(HINSTANCE hInstance);
And I’ve changed the definition further down the program to reflect the change in variable type returned from MyRegisterClass(). The function definition itself is defined as:
//
//  FUNCTION: MyRegisterClass()
//
//  PURPOSE: Registers the window class.
//

BOOL MyRegisterClass(HINSTANCE hInstance)
{
    WNDCLASS wc;

    wc.style          = CS_HREDRAW | CS_VREDRAW;
    wc.lpfnWndProc    = WndProc;
    wc.cbClsExtra     = 0;
    wc.cbWndExtra     = 0;
    wc.hInstance      = hInstance;
    wc.hIcon          = LoadIcon(hInstance, MAKEINTRESOURCE(IDI_WINDOWSPROJECT1));
    wc.hCursor        = LoadCursor(nullptr, IDC_ARROW);
    wc.hbrBackground  = (HBRUSH)(COLOR_WINDOW+1);
    wc.lpszMenuName   = MAKEINTRESOURCEW(IDC_WINDOWSPROJECT1);
    wc.lpszClassName  = szWindowClass;

    return RegisterClassW(&wc);
}
This is the first step in creating a window. Before we can do anything we have to declare a WNDCLASS object and then fill out all the data in its relevant fields. You can research what they are in your own time but there are a few things I’ll point out here. Firstly the default Visual Studio project actually creates a window class of type WNDCLASSEXW which is a newer type with some extra functionality. Older and more easier to understand programs just use WNDCLASS which is what I’ve changed it to here. If you followed the instructions earlier and Visual Studio has created a type of WNDCLASSEXW then it’s not a problem as your code will most likely still compile and run fine. I wanted to use the most simple version for demonstration purposes.
The wc.style field contains the two flags CS_HREDRAW and CS_VREDRAW which is the most standard type for a window. We won’t discuss them here. The next entry however is very important, that being wc.lpfnWndProc = WndProc. This member of the WNDCLASS struct wants to know the name of the function we will use to handle any messages that are sent to our window once it has been created.
You might think that maybe this is a trivial thing. It isn’t. It’s a fundamental part of how Windows works. Once our program has been created and it has made a window, then the Windows Operating System itself will actually send messages to our window. This was very confusing for me at first as I was under the illusion that we as programmers simply instruct the Operating System to do things. That is not correct with Windows. Windows will send many messages to your program and it requires that you write code to deal with them. Hence it wants the name of the function you will write to do this when registering the class (wc.lpfnWndProc = WndProc).
Once that concept is absorbed it makes much more common sense, as how else could you know if a key had been pressed or a mouse button clicked? You’d need the OS (Operating System) to send you a message to tell you that a key press or mouse click had happened. After that, you do something with it (or don’t if it’s not required). In reality, most of the messages your window receives will not be processed by the code you will write, they will be passed to the DefWindowProc() function that you will include in your message handling program.
Fortunately, you don’t have to write all that stuff at first as the Visual Studio Windows Desktop Project template writes it all out for you, but you need to understand how it works anyway. Moving on, we come to the window class’s requirement to save a handle to the application HINSTANCE we discussed before. A window needs to know which application it belongs to, and that’s what this does.
MAKEINTRESOURCE MACRO
The last thing to note is the MAKEINTRESOURCE macro. You’ll see this in a few of the members of the WNDCLASS struct above. Notably the icon and menu name wc.hIcon and wc.lpszMenuName struct members. The MAKEINTRESOURCE macro will cause the OS to scour the resource file (project name).rc we discussed earlier. It essentially resolves either to a name or some data needed to show the correct dimensions and layout of a dialog box, or an image for an icon for example. Where wc.lpszMenuName is concerned you can just open the resource file and find the identifier “IDC_WINDOWSPROJECT1 MENU” (assuming your project is named WindowsProject1) and remove the “IDC_” part to just “WINDOWSPROJECT1 MENU”, and then set the wc.lpszMenuName struct member to wc.lpszMenuName = L”WINDOWSPROJECT1″ and it will work and the menu will display fine.
Cannibalising the resource file like this is rarely a good idea though and it’s best to leave things as they are, however, it’s interesting to note that the wc.lpszMenuName member just wants a name for the menu. Older programs I’ve used which were probably made in much earlier versions of Visual Studio don’t have the MAKEINTRESOURCE macro in any of the code and the resource file contains nothing with any sort of “ID#_” prefix at all. The code just requires the names of the various resources. So if you encounter anything like this you will have some idea what it is and not be surprised by it.
The next function is the InitInstance() function:
BOOL InitInstance(HINSTANCE, int);

.....definition

//
//   FUNCTION: InitInstance(HINSTANCE, int)
//
//   PURPOSE: Saves instance handle and creates main window
//
//   COMMENTS:
//
//        In this function, we save the instance handle in a global variable and
//        create and display the main program window.
//

BOOL InitInstance(HINSTANCE hInstance, int nCmdShow)
{
   hInst = hInstance; // Store instance handle in our global variable

   HWND hWnd = CreateWindowW(szWindowClass, szTitle, WS_OVERLAPPEDWINDOW,
      CW_USEDEFAULT, 0, CW_USEDEFAULT, 0, nullptr, nullptr, hInstance, nullptr);

   if (!hWnd)
   {
      return FALSE;
   }

   ShowWindow(hWnd, nCmdShow);
   UpdateWindow(hWnd);

   return TRUE;
}
Visual Studio has already done a pretty good job of explaining what this function does. We’ll add to the explanation a little however. Note the global variable hInst being set to the function argument hInstance. When a Windows program starts you can think of it as beginning at the:
int APIENTRY wWinMain(HINSTANCE hInstance,
                      HINSTANCE hPrevInstance,
                      LPWSTR    lpCmdLine,
                      int       nCmdShow)
function call. That’s not to say the code above that is ignored however as otherwise our headers and global variables wouldn’t mean anything. This is I find, a good place to think of the program as commencing properly. The OS (Windows) will pass arguments to the function, and one of them is the HINSTANCE hInstance. If you study the code you have open in your Visual Studio window you’ll see that sometime after wWinMain() is called, InitInstance() is called. InitInstance() makes use of the HINSTANCE argument passed into wWinMain() to set the global variable hInst to the HINSTANCE Windows called the program with. Anytime we need to access the HINSTANCE for our program in any function we call (or anywhere else) we can now get it from the global variable hInst and we don’t have to worry about scope issues. That’s what this line does:
hInst = hInstance; // Store instance handle in our global variable
The next line creates the window with the wide-character strings pointed to by the global variables szTitle and szWindowClass. We haven’t yet covered how these strings are made but if you look a little further down the code from wWinMain() in your Visual Studio project you’ll see these lines:
// Initialize global strings
LoadStringW(hInstance, IDS_APP_TITLE, szTitle, MAX_LOADSTRING);
LoadStringW(hInstance, IDC_WINDOWSPROJECT1, szWindowClass, MAX_LOADSTRING);
Which are Windows functions. A quick glance without even doing any research (I haven’t done any on this) tells us that these functions are wide-character versions of functions (note the W at the end of their names) that scour the resource file for identifiers IDS_APP_TITLE and IDC_WINDOWSPROJECT1, look for an associated string of characters and then load them into the global variables szTitle and szWindowclass. The functions require the HINSTANCE for our program and also a maximum string length, which in this case is the macro MAX_LOADSTRING, which is set to 100.
Thus when InitInstance() is called these strings are already defined and filled and thus the CreateWindowW() function:
HWND hWnd = CreateWindowW(szWindowClass,
                          szTitle, WS_OVERLAPPEDWINDOW,
                          CW_USEDEFAULT, 0, CW_USEDEFAULT,
                          0, nullptr, nullptr, hInstance, nullptr);
Knows the names of the window class and title. There are many other parameters for this function which you can research yourself. They will not be covered here. The remainder of the InitInstance() function we’re interested in has the following lines:
ShowWindow(hWnd, nCmdShow);
UpdateWindow(hWnd);
ShowWindow() details can be easily found on the Microsoft Learn website and Microsoft remarks on it as follows:
“The first time an application calls ShowWindow, it should use the WinMain function’s nCmdShow parameter as its nCmdShow parameter.”
MicroSoft Learn – “ShowWindow function (winuser.h)” Available at: https://learn.microsoft.com/en-us/windows/win32/api/winuser/nf-winuser-showwindow (Accessed 7/12/2023)
So the ShowWindow() function requires a handle to the window we created, which was obtained as a return from the CreateWindowW() function, and also the nCmdShow argument passed into wWinMain() at the start.
The next function UpdateWindow() just takes a handle to the created window. This function simply sends a WM_PAINT message to the function we declared as our window’s message handling function, which you may remember from earlier as WndProc().
THE MESSAGE HANDLING FUNCTIONS
The last two functions are message handling functions. You remember from earlier we discussed the need to have a function that handles the messages Windows sends to your program? Well, that function is WndProc(). It can be named anything you want although WndProc() is a fairly concise name. Here’s a recap of the two functions:
LRESULT CALLBACK    WndProc(HWND, UINT, WPARAM, LPARAM);
INT_PTR CALLBACK    About(HWND, UINT, WPARAM, LPARAM);
We’ll consider first the WndProc() function. The function returns an LRESULT which Microsoft describe as a “Signed result of message processing”. The message handling functions return values depending upon whether or not any message sent to the message handling function was processed or not. For the most part, this is outside of our scope at this time. All we need to know is that the message-handling function will receive a message and attempt to process it. It will then return a value based on the outcome of that.
Another thing outside of our scope is the CALLBACK part. This is actually a macro and ultimately resolves to an __stdcall which is related to an __cdecl. We will be leaving these parts well alone during this chapter, and most likely after that too!
Now consider the function’s parameters (HWND, UINT, WPARAM, LPARAM). Notice in the forward declaration we don’t need to specify the names of the parameters, we can just do that in the function definition which is as follows:
//
//  FUNCTION: WndProc(HWND, UINT, WPARAM, LPARAM)
//
//  PURPOSE: Processes messages for the main window.
//
//  WM_COMMAND  - process the application menu
//  WM_PAINT    - Paint the main window
//  WM_DESTROY  - post a quit message and return
//
//

LRESULT CALLBACK WndProc(HWND hWnd, UINT message, WPARAM wParam, LPARAM lParam)
{
    switch (message)
    {
    case WM_COMMAND:
        {
            int wmId = LOWORD(wParam);
            // Parse the menu selections:
            switch (wmId)
            {
            case IDM_ABOUT:
                DialogBox(hInst, MAKEINTRESOURCE(IDD_ABOUTBOX), hWnd, About);
                break;
            case IDM_EXIT:
                DestroyWindow(hWnd);
                break;
            default:
                return DefWindowProc(hWnd, message, wParam, lParam);
            }
        }
        break;
    case WM_PAINT:
        {
            PAINTSTRUCT ps;
            HDC hdc = BeginPaint(hWnd, &ps);
            // TODO: Add any drawing code that uses hdc here...
            EndPaint(hWnd, &ps);
        }
        break;
    case WM_DESTROY:
        PostQuitMessage(0);
        break;
    default:
        return DefWindowProc(hWnd, message, wParam, lParam);
    }

    return 0;
}
You can find a good explanation of a window procedure at the following link:
https://learn.microsoft.com/en-us/windows/win32/winmsg/using-window-procedures
Although I’d only recommend reading as far as the part where it begins discussing Subclasses. The Subclasses part and beyond is not something we require at this stage. For our purposes here we can see that the function receives a handle to our window, a message, and two other arguments which are used to assist the function. Those last two being the WPARAM and LPARAM. The WPARAM is used to query more detailed parts of the message received and is what we use to see if we have selected, for example, an item from our window’s menu. If you check the resource file you’ll see there is a menu defined there which has options “Exit” and “About”, under the headings “File” and “Help”.
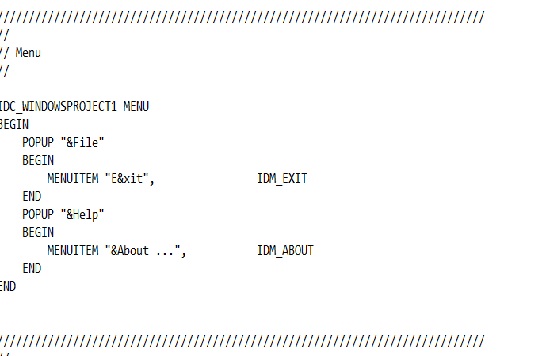
You can see these have identifiers IDM_EXIT and IDM_ABOUT. If you scroll up and look at the message handling function again you’ll see these two in the switch case statement under WM_COMMAND. Note that the window receives a WM_COMMAND message stating something has occurred and then begins another switch case statement that queries the WPARAM to see if it corresponds to either of these identifiers. If the LOWORD part of the WPARAM = IDM_ABOUT it launches the little About dialog box, if the
WPARAM = IDM_EXIT it calls a function to close the window. I won’t go into too many more details here, as that’s enough to get a reasonably basic grasp of what this function is doing.
Note that if the LOWORD part of the WPARAM doesn’t equal either of these values the nested switch case statement passes into the default: part which returns the value from the default window procedure DefWindowProc().
Note also that paying attention to the switch case statements (particularly the break statements) in the function suggests that each function call either returns the value from DefWindowProc() or simply returns 0. The Microsoft example in the link above returns 0 from every possible case in the switch case statement.
The WM_PAINT block is pretty standard for most things we’ll be doing at this stage and it is not advised to change it in any way. WM_PAINT messages appear at various times and for various reasons and there are at least a couple of ways to handle them that I’m aware of, and probably many other ways beyond that. Charles Petzold’s Book “Programming Windows Fifth Edition” goes into substantial details about WM_PAINT messages even in just the early chapters should you wish to find out more.
The IDM_EXIT message runs the DestroyWindow() function that sends the WM_DESTROY message to WndProc() that finally ends the window.
ABOUT BOX MESSAGE HANDLER
The last function to discuss is the message handler for the little dialog box that opens in the window menu. A dialog box message handler is very similar to a window message handler. Just as when we register a window class we have to specify a window message handling function, we have to specify a dialog box message handling function when calling a dialog box. Recalling from above the dialog box message handling function.
INT_PTR CALLBACK About(HWND, UINT, WPARAM, LPARAM);
Note it has a different return type than WndProc(). Not that this seems to matter as in my version of Visual Studio both INT_PTR and LRESULT are defined as an __int64 which is a 64-bit signed integer. Why they are named different things I do not know, but this code was generated by Visual Studio so I’ll stick with the convention. Microsoft describes dialog box procedures as follows:
“Type: INT_PTR
Typically, the dialog box procedure should return TRUE if it processed the message, and FALSE if it did not. If the dialog box procedure returns FALSE, the dialog manager performs the default dialog operation in response to the message.”
MicroSoft Learn – “DLGPROC callback function (winuser.h)” Available at: https://learn.microsoft.com/en-us/windows/win32/api/winuser/nc-winuser-dlgproc (Accessed 7/12/2023)
….and further down the page
“Although the dialog box procedure is similar to a window procedure, it must not call the DefWindowProc function to process unwanted messages. Unwanted messages are processed internally by the dialog box window procedure.”
So it would appear there are a majority of similarities and only a few differences between a window message handler and a dialog box message handler. Have a look at the function below:
// Message handler for about box.

INT_PTR CALLBACK About(HWND hDlg, UINT message, WPARAM wParam, LPARAM lParam)
{
    UNREFERENCED_PARAMETER(lParam);
    switch (message)
    {
    case WM_INITDIALOG:
        return (INT_PTR)TRUE;

    case WM_COMMAND:
        if (LOWORD(wParam) == IDOK || LOWORD(wParam) == IDCANCEL)
        {
            EndDialog(hDlg, LOWORD(wParam));
            return (INT_PTR)TRUE;
        }
        break;
    }

    return (INT_PTR)FALSE;
}
It’s mostly the same, except it returns TRUE when a message has been processed, and FALSE if it hasn’t. You can start the dialog box by running the code and choosing “About” from the “Help” menu item. This begins the call to create the dialog box from WndProc() we saw earlier.
A (BRIEF) SUMMARY
That mostly concludes the discussion of the program. Given that the current version of Visual Studio wraps all the window stuff into functions, we have mostly already covered everything the code will do. Now take a look at the complete code in your Visual Studio project and we’ll briefly discuss what it does.
First, it includes the required header files, then it initializes the global variables, and then provides forward declarations for the functions used. Then it enters the WinMain() function (or wWinMain() function in our case) and then there are a couple of macros that don’t concern us.
After that, it loads the strings into some of our global variables and calls the MyRegisterClass() function which registers our window. And After that, it checks if a call to InitInstance() has succeeded and then proceeds to create a window from the registered window class and then shows and paints the window.
Next comes the LoadAccelerators() function. This doesn’t concern us and isn’t really needed. It basically sets up key shortcuts to menu items. It does however make the initiation of the Windows message loop a little more confusing.
HACCEL hAccelTable = LoadAccelerators(hInstance, MAKEINTRESOURCE(IDC_WINDOWSPROJECT1));

MSG msg;

// Main message loop:
while (GetMessage(&msg, nullptr, 0, 0))
{
    if (!TranslateAccelerator(msg.hwnd, hAccelTable, &msg))
    {
        TranslateMessage(&msg);
        DispatchMessage(&msg);
    }
}

return (int) msg.wParam;
This can be re-written as:
MSG msg;

// Main message loop:
while (GetMessage(&msg, nullptr, 0, 0))
{
    TranslateMessage(&msg);
    DispatchMessage(&msg);
}

return (int) msg.wParam;
And it still works fine. We’ve just removed the parts that load the key shortcuts. Remove it or retain it, it’s up to you. The latter version is easier to understand though.
In both cases, it’s simply a while loop that causes the message retrieval and dispatch process to occur repeatedly. While this is in effect your window stays open and your program runs. Most likely all the games you’ve played and desktop programs/apps you’ve used were running inside a while loop just like this one. The while loop above keeps repeatedly checking for messages and dispatching them to our window. Only when we click on something that destroys the window does it exit and cause the entire wWinMain() function to return, which completely ends our program or app.
And that concludes the first half (or a bit more actually!) of this chapter. Below we will work with a slightly modified window program and one that includes some new header files and a class that will produce our custom dialog box. Now might be a good time to take a rest of indeterminant length before continuing (which is important when learning code).
//————————————————————————-//
THE DIRECTX PART AND DIALOG BOX
From here most discussions will be concerning what we need to do to start DirectX and the dialog box. There will only be short mentions of Windows-specific things. I will also not be covering any C++ learning that you should already have to be able to continue.
I’ve decided to contain all the functions we need in a class called D3DClass. The code is below:
using Microsoft::WRL::ComPtr;

class D3DClass
{
	public:
		D3DClass();
		~D3DClass();

		void	ReleaseCOM(ComPtr<IDXGIFactory4> &factory,
                                   ComPtr<ID3D12Device> &device);

		bool	InitDirectX(ComPtr<IDXGIFactory4> &factory,
                                    ComPtr<ID3D12Device> &device);

		WCHAR*	LogAdapter(ComPtr<IDXGIFactory4>& factory);
		void	LogResolution(ComPtr<IDXGIFactory4>& factory);

		Microsoft::WRL::ComPtr<IDXGIFactory4>	mdxgiFactory;
		Microsoft::WRL::ComPtr<ID3D12Device>	md3dDevice;
		DXGI_FORMAT mBackBufferFormat = DXGI_FORMAT_R8G8B8A8_UNORM;
		std::vector<UINT> mResolutionPair;
		struct resData { UINT w = 0; UINT h = 0; double Hz = 0; };
		std::vector<D3DClass::resData> mComboResData;

		WCHAR mAdapterName[128];
		bool mSetRefresh = false;
		double mRefreshRate = 0;

};
The class we need to perform the task. The ReleaseCOM() function is not actually used as for some reason it caused my program to crash. I suspect the COM objects had released themselves already and this function produced some calls on null pointers. Here it is anyway:
void D3DClass::ReleaseCOM(ComPtr<IDXGIFactory4> &factory, ComPtr<ID3D12Device> &device)

{
	// Release methods causing run time error for some reason

	//device->Release();
	//factory->Release();
}
I commented out the parts that cause the run-time error. Anyway, onto the next function:
bool D3DClass::InitDirectX(ComPtr<IDXGIFactory4> &factory, ComPtr<ID3D12Device> &device)
{
#if defined(DEBUG) || defined(_DEBUG)
	// Enable the D3D12 debug layer.
	{
		ComPtr<ID3D12Debug> debugController;
		ThrowIfFailed(D3D12GetDebugInterface(IID_PPV_ARGS(&debugController)));
		D3D12GetDebugInterface(IID_PPV_ARGS(&debugController));
		debugController->EnableDebugLayer();
	}
#endif

	// create DXGI Factory
	ThrowIfFailed(CreateDXGIFactory1(IID_PPV_ARGS(&factory)));

	// Try to create hardware device.
	HRESULT hardwareResult = D3D12CreateDevice(
		nullptr,             // default adapter
		D3D_FEATURE_LEVEL_11_0,
		IID_PPV_ARGS(&device));

	return true;
}
The #define part is for when we’re compiling in de-bug mode. This part has been written by Frank Luna from his very good book which you can see on the home page picture: 3D Game Programming with DirectX 12. It creates a ComPtr which is from the Component Object Model stuff. Frank Luna describes it as:
“Component Object Model (COM) is the technology that allows DirectX to be programming-language independent and have backwards compatibility.”
3D Game Programming with DirectX 12 – Frank Luna, Chapter 4 page 90
(Accessed 8/12/2023)
There are various types of ComPtr and the ones we use you can see in the class definition, notably IDXGIFactory4 and ID3D12Device. The IDXGIFactory4 is what we use to acquire data from the hardware we have on our computer. Namely the graphics adapter (or graphics card). Note that we don’t actually use the ID3D12Device to acquire this data. So this is sort of two API’s in one program. This is not really a place for a discussion of what COM is, and I’m not familiar enough with it myself to describe it either. You can find more information about COM online.
So back to the code, if we are running de-bug the code creates a pointer to a ID3D12Debug interface. The next part uses two macros which need brief explanation. The ThrowIfFailed macro is defined as follows:
#ifndef ThrowIfFailed
#define ThrowIfFailed(x)                                              \
{                                                                     \
    HRESULT hr__ = (x);                                               \
    std::wstring wfn = AnsiToWString(__FILE__);                       \
    if(FAILED(hr__)) { throw DxException(hr__, L#x, wfn, __LINE__); } \
}
#endif
I cannot remember whether this is Microsoft’s code or whether Frank wrote this himself. Either way, I want to note that this isn’t my code. I always try and mention when code isn’t mine, which is important when writing anything that gets published online. We can see that the #define creates a block of code with a HRESULT which stores the return from a function call. Then it creates a wide string from the Standard Library and runs a function AnsiToWString() which is shown below:
inline std::wstring AnsiToWString(const std::string& str)

{
    WCHAR buffer[512];
    MultiByteToWideChar(CP_ACP, 0, str.c_str(), -1, buffer, 512);
    return std::wstring(buffer);
}
Which appears to take a __FILE__ type as an argument if you check the code above again. On my screen in Visual Studio both __FILE__ and __LINE__ show up as purple coloured which suggests they are macros. I cannot find any definition for them however, it simply shows an error when I try. To cut a long story short the ThrowIfFailed macro appears to take the HRESULT return from a function call, then retrieves a filename which it converts to a wide character string, and then throws an exception if it fails. The DxException you can see in the ThrowIfFailed #define is in fact a class and the line calls its constructor with some data which it uses to initialize its data members. Here’s the class below:
class DxException
{
public:
    DxException() = default;
    DxException(HRESULT hr, const std::wstring& functionName, const std::wstring& filename, int lineNumber);

    std::wstring ToString()const;

    HRESULT ErrorCode = S_OK;
    std::wstring FunctionName;
    std::wstring Filename;
    int LineNumber = -1;
};

DxException::DxException(HRESULT hr, const std::wstring& functionName, const std::wstring& filename, int lineNumber) :
    ErrorCode(hr),
    FunctionName(functionName),
    Filename(filename),
    LineNumber(lineNumber)
{
}

std::wstring DxException::ToString()const
{
    // Get the string description of the error code.
    _com_error err(ErrorCode);
    std::wstring msg = err.ErrorMessage();

    return FunctionName + L" failed in " + Filename + L"; line " + std::to_wstring(LineNumber) + L"; error: " + msg;
}
You can see the constructor and the way calling it initializes the data members, also there seems to be a member function doing some sort of string conversion. I’ll be honest I’m not completely sure what this all does, but it seems to be a way of showing specific data relating to a failed function call that would help with debugging. Most of this is outside the scope of this page, however I didn’t want to just skip over it without mentioning anything about it.
The last two parts of the member function InitDirectX() create the DirectX factory and device interfaces. The first uses the ThrowIfFailed macro again and the second simply acquires the HRESULT return from the function. In Frank’s code it originally did the following:
// Try to create hardware device.
HRESULT hardwareResult = D3D12CreateDevice(
	nullptr,             // default adapter (see comments in below paragraph)
	D3D_FEATURE_LEVEL_11_0,
	IID_PPV_ARGS(&md3dDevice));

// Fallback to WARP device.
if(FAILED(hardwareResult))
{
	ComPtr<IDXGIAdapter> pWarpAdapter;
	ThrowIfFailed(mdxgiFactory->EnumWarpAdapter(IID_PPV_ARGS(&pWarpAdapter)));

	ThrowIfFailed(D3D12CreateDevice(
		pWarpAdapter.Get(),
		D3D_FEATURE_LEVEL_11_0,
		IID_PPV_ARGS(&md3dDevice)));
}
In our program however, I chose to remove the part about the WARP device, as I wanted to keep things simple. The WARP device is a kind of backup renderer if an attempt to initialize DirectX with the default adapter (graphics card) fails. Interesting to note from the code above is that if you wish to use whatever the default adapter is for your machine you just pass a nullptr into the function for that argument. Also note that the function to initialize DirectX requires that you specify a feature level, which in this case is D3D_FEATURE_LEVEL_11_0. This allows you if you wish to run in older versions of DirectX, presumably if you wish to provide compatibility with older systems for whomever you’re writing the software for.
The (thankfully) last part of the InitDirectX function to discuss is the IID_PPV_ARGS macro. It’s defined as follows:
#define IID_PPV_ARGS(ppType) __uuidof(**(ppType)), IID_PPV_ARGS_Helper(ppType)
This takes the address of a ComPtr (hence the variable name ppType, pointer to pointer) and turns it into two function arguments. A description of exactly what these are is beyond our scope at this time. As far as we need to be concerned it takes one argument and then makes it into two, which the CreateDXGIFactory1() and D3D12CreateDevice() functions require.
INITDIRECTX FUNCTION SUMMARY
If (like me) your eyes are beginning to glaze over, then fear not we’ve reached the end of the discussion for this function. In conclusion, we have two empty pointers:
Microsoft::WRL::ComPtr<IDXGIFactory4> mdxgiFactory
and
Microsoft::WRL::ComPtr<ID3D12Device> md3dDevice
as data members in our class. We pass these into the InitDirectX function which creates the DXGI factory (for acquiring adapter data) and the DirectX device (the thing that does the rendering), which we can now access through these pointers. The function also performs some de-bug facilitation as well.
LOGADAPTER FUNCTION
Now we can move on to something a little more interesting. Once we’ve run the InitDirectX function we now have a factory and and a device loaded and have pointers to them stored in our class. You’ll see exactly where and how we call the InitDirectX and all other functions later in this page. Now we get to do something with one of them:
WCHAR* D3DClass::LogAdapter(ComPtr<IDXGIFactory4>& factory)
{
	IDXGIAdapter* adapter = nullptr;

	if ( (factory->EnumAdapters((UINT)0, &adapter)) != DXGI_ERROR_NOT_FOUND )
	{
		DXGI_ADAPTER_DESC desc;
		adapter->GetDesc(&desc);
		wcscpy_s(mAdapterName, desc.Description);

		return mAdapterName;
	}

	return nullptr;
}
This function takes a pointer to the factory and then creates an IDXGIAdapter* pointer named adapter which is initialized to null. The next lines start with a call to the interface method EnumAdapters() which takes an index (we use 0 for the default adapter) and the pointer declared as arguments. After this function call occurs the adapter variable can now be used to access display data for the graphics adapter. We create a struct of type DXGI_ADAPTER_DESC and pass that in as an argument to the adapter interfaces method GetDesc(). This fills out the desc struct with data about the graphics adapter. For this function, we’re just interested in acquiring its name, which we then copy into our class data member mAdapterName with the line:
wcscpy_s(mAdapterName, desc.Description);
So we now have a wide character string with the graphics adapter’s name stored in our class.
LOGRESOLUTION FUNCTION
This function does most of the work when it comes to retrieving all the data we want from the (graphics) adapter. Here it is:
void D3DClass::LogResolution(ComPtr<IDXGIFactory4>& factory)

{
	UINT count = 0;
	UINT flags = 0;
	UINT refreshRate = 0;

	IDXGIAdapter* adapter = nullptr;
	IDXGIOutput* output = nullptr;
	mResolutionPair.clear();

	if ( (factory->EnumAdapters((UINT)0, &adapter)) != DXGI_ERROR_NOT_FOUND )
	{

		if ( (adapter->EnumOutputs((UINT)0, &output)) != DXGI_ERROR_NOT_FOUND )
		{
			DXGI_OUTPUT_DESC desc;
			output->GetDesc(&desc);
		}
	}

	// Call with nullptr to get list count.
	output->GetDisplayModeList(mBackBufferFormat, flags, &count, nullptr);

	std::vector<DXGI_MODE_DESC> modeList(count);
	output->GetDisplayModeList(mBackBufferFormat, flags, &count, &modeList[0]);

	for (int i = 0; i < count; i++)
	{
		UINT n = modeList[i].RefreshRate.Numerator;
		UINT d = modeList[i].RefreshRate.Denominator;

		if ( (mSetRefresh == true ) && ((double(n) / d) == 60.0) )
		{
			mResolutionPair.push_back(modeList[i].Width);
			mResolutionPair.push_back(modeList[i].Height);
			mResolutionPair.push_back(n);
			mResolutionPair.push_back(d);
		}
		else if (mSetRefresh == false)
		{
			mResolutionPair.push_back(modeList[i].Width);
			mResolutionPair.push_back(modeList[i].Height);
			mResolutionPair.push_back(n);
			mResolutionPair.push_back(d);
		}
	}

	#ifdef SKIP // change to _DEBUG to display
	for (int i = 0; i < mResolutionPair.size(); i = i + 4)
	{
            std::wstring text = L"Width : "
            + std::to_wstring(mResolutionPair[i])
            + L" Height : "
            + std::to_wstring(mResolutionPair[i + 1]) + L"\n"
            + L"Refresh Rate: "
            + std::to_wstring(mResolutionPair[i + 2] / mResolutionPair[i + 3])
            + L"\n";
	    OutputDebugString(text.c_str());
	}
	#endif

	return;
}
That’s quite a function compared to the others we’ve met so far. It’s not called frequently though. It begins with the initialisation of 3 unsigned integers, although we only use two of them here, one is redundant (refreshRate). The function proceeds rather like the LogAdapter() function by creating a pointer to an IDXGIAdapter* and also a new pointer type which is IDXGIOutput* output. Where a graphics card is an adapter, a monitor is an output. We only consider one output here, we will not be concerning ourselves with multiple outputs.
Then the function resets the class data member mResolutionPair, which is an std::vector of UINTS. This vector will store our display data in blocks of 4. It will store 2 values for display resolution, and a numerator and denominator for a display refresh rate (Hz or fps) in that order. We proceed as we did in the earlier function and acquire a pointer to an adapter interface. The only difference here, is that we also acquire a pointer to an output interface.
Once we have, we fill out a new struct type called DXGI_OUTPUT_DESC using the output interface’s method GetDesc(). Note for this program though we don’t do anything with it. In Frank Luna’s original code he used this struct to show the name of the output. I’ve decided that we don’t need to do that here as I’d like to keep things simple. I thought I’d leave that part of the code in however to demonstrate how you can retrieve a struct which has data about the output, including its name.
The next lines are as follows (note that the flags variable is passed but is not used as it’s beyond our scope at this time):
// Call with nullptr to get list count.
output->GetDisplayModeList(mBackBufferFormat, flags, &count, nullptr);

std::vector<DXGI_MODE_DESC> modeList(count);
output->GetDisplayModeList(mBackBufferFormat, flags, &count, &modeList[0]);
Once we have a pointer to an output interface we call its GetDisplayModeList() method. Note the comment. If we call this function with a nullptr as its last argument it fills out the count variable with the number of display modes available for a given back buffer format. That’s why the function wants the address of the count variable so we don’t just pass in and fill a copy of it (we need to refer to it shortly). If you check the class definition again you’ll see we have the back buffer format stored as a data member in our class. In case you don’t wish to scroll up I’ll show it again here:
DXGI_FORMAT mBackBufferFormat = DXGI_FORMAT_R8G8B8A8_UNORM;
This is the buffer format Frank Luna used in his code which I learned from. I assume it’s a fairly standard or basic type so I decided not to change it. There are several other types you can use however. Once we have the count variable filled with the number of modes available for the current output and back buffer format we can create a vector with the correct size to store the display mode data.
std::vector<DXGI_MODE_DESC> modeList(count);
The DXGI_MODE_DESC struct is where we finally have access to the display mode data which is comprised of resolution width and height and refresh rate data. Microsoft defines the struct as follows:
typedef struct DXGI_MODE_DESC
{
    UINT Width;
    UINT Height;
    DXGI_RATIONAL RefreshRate;
    DXGI_FORMAT Format;
    DXGI_MODE_SCANLINE_ORDER ScanlineOrdering;
    DXGI_MODE_SCALING Scaling;
} DXGI_MODE_DESC;
And you can see the data we need there in the struct definition, along with some things we don’t need for our program. Note the refresh data we want is actually stored in yet another struct named DXGI_RATIONAL inside the DXGI_MODE_DESC:
typedef struct DXGI_RATIONAL
{
    UINT Numerator;
    UINT Denominator;
} DXGI_RATIONAL;
The next line:
output->GetDisplayModeList(mBackBufferFormat, flags, &count, &modeList[0]);
Now has the address of the first element of the modelist as the last argument to the function and is ready for the loop below, with the modelist vector now having been filled out with the required data by the method:
for (int i = 0; i < count; i++)
	{
		UINT n = modeList[i].RefreshRate.Numerator;
		UINT d = modeList[i].RefreshRate.Denominator;

		if ( (mSetRefresh == true ) && ((double(n) / d) == 60.0) )
		{
			mResolutionPair.push_back(modeList[i].Width);
			mResolutionPair.push_back(modeList[i].Height);
			mResolutionPair.push_back(n);
			mResolutionPair.push_back(d);
		}
		else if (mSetRefresh == false)
		{
			mResolutionPair.push_back(modeList[i].Width);
			mResolutionPair.push_back(modeList[i].Height);
			mResolutionPair.push_back(n);
			mResolutionPair.push_back(d);
		}
	}
This part fills out our data member mResolutionPair vector with the width, height, numerator, and denominator values. Remember we discussed earlier that this vector stores data in blocks of 4. If the data member boolean variable mSetRefresh is set to true and the refresh rate resolves to 60.0 it fills out the mResolutionPair vector only with data for refresh rates of 60Hz or 60fps. I added it as a little extra feature to our program for use with the dialog box later. If mSetRefresh is false however it fills out the mResolutionPair vector with every available resolution and refresh data.
You may notice the rather ill-advised practice of using a == comparison with a floating point value. So far it’s caused no issues but if you wish you can re-write the code to use an integer value instead.
The last part of the LogResolution() function is just used when compiling in de-bug mode to write data to the de-bug output to check the values in the vector are all valid. And that concludes the function description. If you’ve made it this far you’ve done well, as that is the bulk of the code covered. The next part will concern our main .cpp file where the Windows code runs the dialog box and consults the mResolutionPair vector to add strings and data to the combo box in the dialog box.
THE .CPP FILE
This is the same as the Windows program we were discussing earlier. It has some slight modifications though. If you open the code from the link provided at the end and look at the .cpp file you’ll see it’s mostly the same as that which we discussed before just with a few differences. It contains some new functions, a custom-built dialog box for our data, a slight alteration to the menu, and a new function for handling dialog box messages. One of the header files has also been updated to allow for some basic DirectX calls to be made.
The class functions we discussed above are contained within the class but there are some new functions that are part of the .cpp file we will need also for adding and retrieving data from the combo box control in the dialog box.
The code starts the same way as before and creates an instance of our class before proceeding to create the window and so on. The menu item “Options” calls the dialog box. You can see this in the WndProc() window message handling function.
case IDM_OPTIONS:
    DialogBox(hInst, MAKEINTRESOURCE(IDD_PROPPAGE_MEDIUM), hWnd, ChooseRender);
This line would have called the About Box in the Windows discussion earlier, but here it’s been changed to call the dialog box I made with the identifier IDD_PROPPAGE_MEDIUM (yes it’s actually called that!), and the message handling function associated with it ChooseRender(). Note I should really have changed this function to return an INT_PTR rather than an LRESULT as discussed earlier. I’ve found no problems though, and given they are the same data type it doesn’t seem to be an issue (for now):
// Message handler for dialog box.
LRESULT CALLBACK ChooseRender(HWND hDlg, UINT message, WPARAM wParam, LPARAM lParam)
{
    WCHAR* text = nullptr;
    LRESULT checkBox = Button_GetCheck(GetDlgItem(hDlg, IDC_CHECK1));

    switch (message)
    {
        case WM_INITDIALOG:
        {
            setAdapterBufferField(text, hDlg);  // fills out text fields for adapter

            D3DObj.LogResolution(D3DObj.mdxgiFactory);  // fills class vector with
                                                        // display data

            SendMessageW(GetDlgItem(hDlg, IDC_COMBO1), CB_RESETCONTENT, 0, 0);
                                                        // clear combo box

            setResolution(hDlg);  // loads class data into combo box fields
                                  // and strings for selection

            SendMessageW(GetDlgItem(hDlg, IDC_COMBO1),
                        CB_SETCURSEL,
                        (WPARAM)0,
                        (LPARAM)0);  // sets starting selection in combo box

            setRefresh(hDlg);  // shows Refresh Rate

            return TRUE;
        }

        case WM_COMMAND:
        {
            if (LOWORD(wParam) == IDC_BUTTON1)
            {
                EndDialog(hDlg, LOWORD(wParam));
                return TRUE;
            }

            if (LOWORD(wParam) == IDC_CHECK1)
            {
                    if (LOWORD(wParam) == IDC_CHECK1)
                    {
                        D3DObj.mSetRefresh = (checkBox == BST_CHECKED);
                        D3DObj.LogResolution(D3DObj.mdxgiFactory);
                        SendMessageW(GetDlgItem(hDlg, IDC_COMBO1),CB_RESETCONTENT, 0, 0);
                        setResolution(hDlg);
                        return TRUE;
                    }
            }

            if ((LOWORD(wParam) == IDC_COMBO1) && HIWORD(wParam) == CBN_SELCHANGE)
            {
                setRefresh(hDlg);
                return TRUE;
            }
        }
    }

    return FALSE;
}
The function starts by initializing a pointer to a WCHAR and also a variable named checkbox which stores the true or false value in the refresh rate checkbox. Then when it receives the WM_INITDIALOGBOX message it makes function calls to retrieve data from the hardware, fill out all the resolution data we need (stored in our class), clear out the combo box, and then fill out the combo box with both strings and data. The strings we load into the combo box are what you see displayed in the little drop-down box which allows you to make selections within it. Each entry has an index associated with it too, and that index is where we store the real data behind the string you see in the combo box.
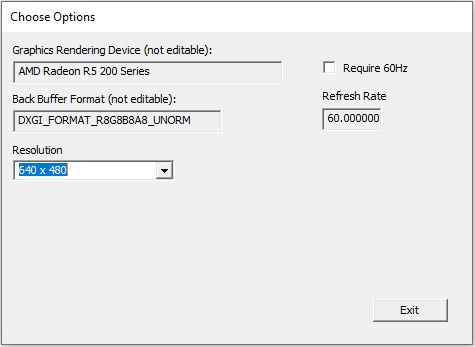
So any given combo box entry has both a string for display purposes and some real data behind it which is what we’re really selecting. The next line in the WM_INITDIALOG message block simply sends a message to the combo box telling it to set the current selection to the first entry (index 0), and the last line loads the refresh rate into the refresh rate text field. It would probably be helpful here to show a picture of what it looks like for clarity:
If you wish to learn more about the messages you can send with the SendMessage() function (and its wide string and ASCII variants SendMessageW() and SendMessageA()) you can find plenty of information in the Microsoft documentation online. I used SendMessageW() here because I always prefer to use wide character functions where possible, although you probably could just write SendMessage() and let the macro choose for you.
One quick thing to note is that every box or “control” in the dialog box, be it a text box or combo box, etc.. has its own window handle HWND. We need to acquire this before sending messages to them. That’s why:
SendMessageW(GetDlgItem(hDlg, IDC_COMBO1), CB_RESETCONTENT, 0, 0);
has the part GetDlgItem(hDlg, IDC_COMBO1) in the function arguments. It takes the parent window handle (the HWND of the dialog box hDlg) and the identifier of the combo box (in our case IDC_COMBO1 which you can find in the “Resource.h” file) and returns the window handle to the combo box. We can then send messages to it. This particular message is of type CB_RESETCONTENT which clears out all the entries making them ready to be re-loaded. Others such as CB_SETCURSEL set the current index selection whilst CB_GETCURSEL returns the current index selection.
I would discuss further what the message loop is doing but, if you have made it this far you will probably benefit more from figuring it out yourself. If you decide to download and run the code you can try to make a few different selections in the dialog box to see what’s happening.
The last part of this page will simply show the functions in the .cpp file that interact with the dialog box. Remember these are not the same functions we made in our class, although they do make use of them.
void setAdapterBufferField(WCHAR* text, HWND hDlg)

{
    text = D3DObj.LogAdapter(D3DObj.mdxgiFactory);
    SetWindowTextW(GetDlgItem(hDlg, IDC_EDIT1), text);
    SetWindowTextW(GetDlgItem(hDlg, IDC_EDIT2), L"DXGI_FORMAT_R8G8B8A8_UNORM");

    return;
}
Takes a pointer to a WCHAR and the HWND of the dialog box. Then makes use of our class function to retrieve the adapter name and loads it into the correct text box. Also shows the buffer format in its designated text box. Note the user cannot edit this.
void setResolution(HWND hDlg)
{
    D3DObj.mComboResData.clear();
    D3DClass::resData _resData;
    int j = 0;

    for (int i = 0; i < D3DObj.mResolutionPair.size(); i += 4)
    {
        D3DObj.mComboResData.push_back(_resData);
    }

    for (int i = 0; i < D3DObj.mResolutionPair.size(); i += 4)
    {
        _resData.w = D3DObj.mResolutionPair[i];
        _resData.h = D3DObj.mResolutionPair[i + 1];
        _resData.Hz = (double)(D3DObj.mResolutionPair[i + 2])
                               / D3DObj.mResolutionPair[i + 3];

        std::wstring _resolution = std::to_wstring(_resData.w) +
            L" x " + std::to_wstring(_resData.h);

        const WCHAR* resolution = _resolution.c_str();
        D3DObj.mComboResData[j] = _resData;

        WPARAM nI = (WPARAM)SendMessage(GetDlgItem(hDlg, IDC_COMBO1),
                                        CB_ADDSTRING,
                                        (WPARAM)0,
                                        (LPARAM)resolution);

        SendMessage(GetDlgItem(hDlg, IDC_COMBO1),
                    CB_SETITEMDATA,
                    (WPARAM)nI,
                    (LPARAM) & (D3DObj.mComboResData[j]));
        j++;

        #ifdef SKIP  // change to _DEBUG to display
            std::wstring _string = std::to_wstring(_resData.w) + L" "
                + std::to_wstring(_resData.h) + L"\n"
                + std::to_wstring(_resData.Hz) + L"\n"
                + std::to_wstring(nI) + L"\n\n"; // may as well print nI, too
            OutputDebugString(_string.c_str());
        #endif
    }

    return;
}
This is where the data is loaded into the combo box. Note the CB_ADDSTRING message in the SendMessageW() call. This loads a string into the combo box entry and returns an index to it (which we set to WPARAM nI). If the loop runs when the box has just been cleared this index will start with zero and increment on from there. Note the short for loop at the top. For a discussion of a puzzling bug this fixed see the link below:
Function bug discussion and solution.
Also, note the way the data is loaded into the same index for the combo box with another message CB_SETITEMDATA. As far as I know, a combo box entry’s actual data takes a pointer to void (void*). Which means for our purposes it can be just about anything. The message just requires an index and a data address to go with it.
The last part was added when we were trying to solve the bug that occurred and we wanted to see if the data we were trying to load into the combo box was valid. I’ve left it in as a matter of interest.
The last function we’ll briefly mention is the setRefresh() function. I’ll just show it, I won’t discuss it. If you’ve been following this page as far as this and have understood the material (or most of it) understanding this function should be child’s play:
void setRefresh(HWND hDlg)

{
    WPARAM nI = SendMessageW(GetDlgItem(hDlg, IDC_COMBO1),
                             CB_GETCURSEL,
                             (WPARAM)0,
                             (LPARAM)0);

    auto _resData = (D3DClass::resData*)SendMessageW(GetDlgItem(hDlg, IDC_COMBO1),
                                                     CB_GETITEMDATA,
                                                     (WPARAM)nI,
                                                     (LPARAM)0);

#ifdef SKIP  // change to _DEBUG to display
    std::wstring _string = std::to_wstring(_resData->w) + L" "
        + std::to_wstring(_resData->h) + L"\n"
        + std::to_wstring(_resData->Hz) + L"\n"
        + std::to_wstring(nI) + L"\n\n"; // may as well print nI, too
    OutputDebugString(_string.c_str());
#endif

    D3DObj.mRefreshRate = _resData->Hz;
    SetWindowTextW(GetDlgItem(hDlg, IDC_EDIT3),
                   std::to_wstring(D3DObj.mRefreshRate).c_str());

    return;
}
And that is the end of this page and you might say…chapter. It was rather longer than I expected and I decided to cut short some of the more detailed explanations near the end in the expectation the reader’s acquaintance with code and concepts had increased by that time. I’d recommend downloading the code and browsing through it, even if you don’t run it. I find staring at code waiting to be compiled is a much better way to get an impression of what it’s doing rather than spending too much time reading about it online or in books.
I hope you enjoyed this page’s contents and if you’d like to get in touch for whatever reason you can drop me a line at:
chris.h.kp.2022@gmail.com
Link to the code:
The next page/chapter will deal with wrapping our code up in a slightly neater and more usable way but without actually changing anything it does. At this time I have no idea when it will be completed.
Many Thanks
Chris =H= 9th December 2023
