
MOVING INTO COLLISION DETECTION
I’ve been rather busy the last few months on a bit of a departure from our usual topics we’ve been discussing. In fact I mostly haven’t even been programming in C++ at all, except rather recently. I’ve been programming in JavaScript on a HTML page. The reason why is that it’s time to move into collision detection, and the best book I could find on the subject does all its demonstrations using JavaScript running in a browser tab.
We could have just continued further exploring DirectX concepts had I decided to, but the project has sensible limitations when it comes to graphics. We need to start looking at how we’re actually going to turn any of this knowledge into a playable game. And for that we’re going to need collision detection. Without a working collision detection system, our on screen character could just walk through walls and hedge rows alike without any restrictions. They could also walk on water. You would just see a character moving around a scene without any restrictions at all, and it would feel entirely unbelievable.
Given that we’re somewhere near the end of graphics concerns in this project, I decided it was time to approach this subject. As always – any textbooks I use, will be named and recommended. The one for this chapter is the one you see below:

The picture isn’t cropped all that well and it looks a little tired. Seems I even left my book mark in there too. Don’t let a bad picture fool you though, that book is very good and is the basis of all the collision detection stuff we use in this chapter. It covers collision detection first, and then physics. We’re only focussing on collision detection for this chapter. For a proper explanation of exactly what’s happening, you must read the book. It isn’t very expensive and you can acquire their HTML/JavaScript code online easily enough, as last time I checked they make it available for download.
Before we progress I would like to mention something I missed in the last chapter. I’ve been trying to add a colour code for the code snippets I post. It isn’t perfect but it does make it a bit more interesting to look at than a snippet full of all the same coloured text. A short key follows:
Data types, keywords and operators – dark blue
Data types (such as classes and structs) we or the textbook author made – light blue
More native types (such as std or DirectX) – orange
Variables and objects in existence – lime
For, break, while etc.. – Magenta (dark pink)
Functions – off yellow
It’s not brilliant, but its a bit better than a miserable looking wall of code that’s all the same colour.
Returning to collision detection, in this project (in its current state) we deal only with a rectangle colliding with lines. You may notice in the source code there are also functions there to accommodate rectangle to rectangle collision. They will be used in a later date in other versions of the project. For now, rectangle to line collision is good enough for what we need. If you buy and read the recommended book (which you should) you’ll notice that it doesn’t deal with lines. I had to add that functionality to it myself. It wasn’t too bad and simply uses parts of the rectangle class and collision functions, adapted as needs be.
If you study the source code you’ll see that the shapes have to be made in quite a specific way. A rectangle will obviously have 4 points and 4 faces. So 4 vertices to represent all the points and 4 face normals corresponding to each face. The convention used for a rectangle is that the upper left most vertex is considered to be vertex zero, and its corresponding face normal is the one pointing straight upwards. In that respect we go round in a clockwise fashion. So the upper right most vertex is considered to be vertex one and its corresponding face normal points directly to the right. An example of what a rectangle looks like in this project is shown below:

The other shape we use is a line. A line as you can imagine is rather more simple. Just two vertices and one face normal. Note the direction of its face normal is arbitrary however. We have to compute it ourselves offline. This does require you to be a little handy with trigonometry, but I was happy to accept that as the lines are what forms the basis of the entire scene boundaries. As such, a good deal of planning should be expected.
Before moving on perhaps I should expand a bit on that. The rectangle (of which there is only one for the code in this project) represents what you might call the ‘character tile’. This tile moves around a scene and collides with lines. The lines prevent the tile from moving across boundaries that represent barriers (such as water) or solid objects (such as walls or hedge rows). A typical scenario is shown below:

A rectangle colliding with a line at an angle. It should be pointed out in the demonstration code for this project all the lines are either vertical or horizontal. That was simply for ease of demonstration purposes. The code can however, cope just as well with lines at an angle. In fact rectangles colliding with lines at angle is what most of the testing scenarios were comprised of, when I was doing testing in the HTML. You can see from the above picture there are two possible ways to resolve this collision. Either by moving the rectangle along the red line, or the green line. Either will resolve the collision.
The code in the project will choose the shortest of the two. In this case the rectangle will be moved off the line following the red path. To acquire both of the red and green possibilities each shape has to be tested against one another. You can see some of this in the source code as follows (if you have been reading the recommended book you will already know the function findAxisLeastPenetration):
bool RectangleShape::collidedRectLine(RigidShape& thisShape, RigidShape& otherShape, CollisionInfo& collisionInfo)
{
    bool status1 = false;
    bool status2 = false;
    CollisionInfo collisionInfoS1;
    CollisionInfo collisionInfoS2;
    LineShape* pOtherShape = static_cast<LineShape*>(&otherShape);

    status1 = findAxisLeastPenetrationLine(otherShape, collisionInfoS1);

    if (status1)
    {
        status2 = pOtherShape->findAxisLeastPenetrationLine(thisShape, collisionInfoS2);

	if (status2)
	{
	    if (collisionInfoS1.mDepth < collisionInfoS2.mDepth)
	    {
	        collisionInfo.setInfo(collisionInfoS1.mDepth,
                                      collisionInfoS1.mNormal,
                                      collisionInfoS1.mStart);
	    }
	    else
	    {
	        XMFloat3Scale(collisionInfoS2.mNormal, -1.0f);
		collisionInfo.setInfo(collisionInfoS2.mDepth,
                                      collisionInfoS2.mNormal,
                                      collisionInfoS2.mStart);
	    }
	}
    }

    return status1 && status2;
}
Note that the two booleans status1 and status2 are used once for each shape type. The first call is from the current shape (rectangle) member function, but the other is called from pOtherShape’s member function. Each fills out its own copy of a CollisionInfo struct and then the collision depths are compared afterwards. Depending upon the result of the test the main CollisonInfo struct is filled with the collision data corresponding to the shortest distance (collision depth).
Further up the hierarchy this main CollisionInfo struct is used to actually move the rectangle out of collision. This happens very fast and continuously, so all we see is a rectangle that never seems to penetrate the lines in the scene.
CLOSING THOUGHTS AND ADDITONAL INFO
What? We’re at the end already? Yes, sadly we are. You could confidently claim that a subject of this magnitude warrants a much longer chapter, with a much greater explanation of the details of collision detection present in the source code. We’ve barely scratched the surface of what’s in the source code here. But that however is the reason why this chapter is so much shorter than ones before it. The subject is just too complex for me to be able to explain it all here.
That’s why you need to read the recommended book. That’s what the book’s there for. When I first opened that text book I had no clue about collision detection. From there, I’ve gone to understanding it thoroughly (the parts I needed to), testing it very intensely, adding a new shape class to the code (the Line Shape), and then finally porting all of it over into C++ where it can mate with DirectX to draw what’s happening. It has taken probably hundreds of hours to do. There’s no way I can condense that into a blog chapter.
I recommend reading the book and studying the source code a great deal if you really wish to understand it. The source code contains a working collision detection library compiled as a dynamic link library. It is encapsulated and accessed in exactly the same way the rendering library is, if you remember that from earlier chapters.
So we now have two DLL’s the main app can access to do the difficult and detailed work for us. If you do intend to study the source code, it will no doubt be of great help to you to see a working example already in existence written in C++. I had to choose the code design carefully to allow it to work in the same way it did in the HTML page.
There’s one major class at the top which holds a vector of all shapes. Below that is a parent class for all shapes named RigidShape. This contains some generic data common to all shapes. All actual shapes with shape specific data and functions inherit from the RigidShape class. Needless to say I had many problems getting this to work, but I managed to overcome them all and produce a nice and straightforward way of handling the collision of multiple simple shapes in a C++ class based hierarchy.
The last thing to consider is how the collision detection library (named Geometry Handler) and the rendering library are connected. Put simply, the collision detection stuff goes first, and then returns a shape’s new position as a simple array of floats to the main application. The main application then instructs the rendering library to draw the shape at that location.
You may notice the main application looking a little cleaner than before too. I’ve written some helper functions and a library managing class to remove clutter from the WinMain function and program loop.
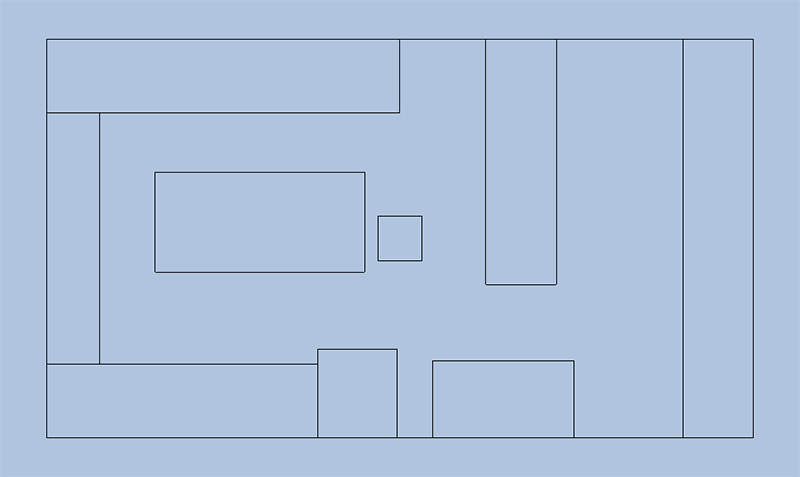
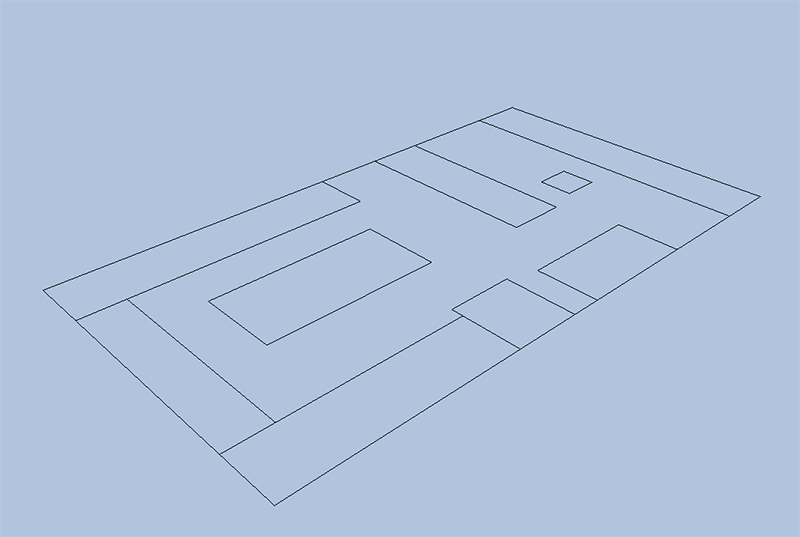
Anyway I hope you enjoy the latest version of the source code. It contains a simplified scene of our kitchen at my current workplace. The rectangle is the ‘character tile’ where a character will eventually be drawn. And the bounded areas are where things like tables and an oven will eventually be drawn. As already mentioned don’t be fooled by the vertical and horizontal lines. This will work with angled lines as well. At any angle for that matter.
Here’s a little picture of what it looks like when running. The small rectangle in the middle, is moved by the W,A,S,D keys and the camera by the arrow keys, and the rectangle cannot enter the areas bounded by lines when it moves:
Oh and don’t forget, because this is all rendered in DirectX we can move the camera around to see the scene at a slant and it renders perfectly:
I’ll post a link to the source code below should you wish to inspect or even compile it. If you wish you can contact me on my email address too. I’ve posted it before, but that was some time ago, so I’ll post it again here. Thank you for reading 🙂
chris.h.kp.2022@gmail.com
